
EEG Visualising Pendant shown with 3D printed frames
Introduction and motivation
I developed the EEG visualising pendant for use in social situations. The pendant uses EEG (Electroencephalography) signals, which are gleaned from a NeuroSky MindWave Mobile headset. The MindWave is a standalone headset device that detects electrical signals from the brain, which are accessed via a single electrode on a protruding arm from the headband. The electrode makes contact via the wearer’s forehead at the pre-frontal cortex area, where higher thinking states are dominant.
UPDATE: a full account of the EEG Visualising Pendant and how it was used in focus groups and field tests with potential users of emotive wearables can be found in my PhD thesis Responsive and Emotive Wearables: devices, bodies, data and communication (2018) http://research.gold.ac.uk/24005/
The pendant displays data described by the manufacturers as associated with ‘attention’ and ‘meditation’. The attention/concentration data is visualised on the matrix display as constantly updating red LED (light emitting diodes) shapes and patterns and meditation / relaxation data is displayed as green LED shapes and patterns. The pendant incorporates live, record and playback functions, which give the user the choice of displaying real-time EEG visualisations or by recording they can change the synchronisity of the displayed data by playing back up to four minutes of previous brainwave data visualisations as a loop.
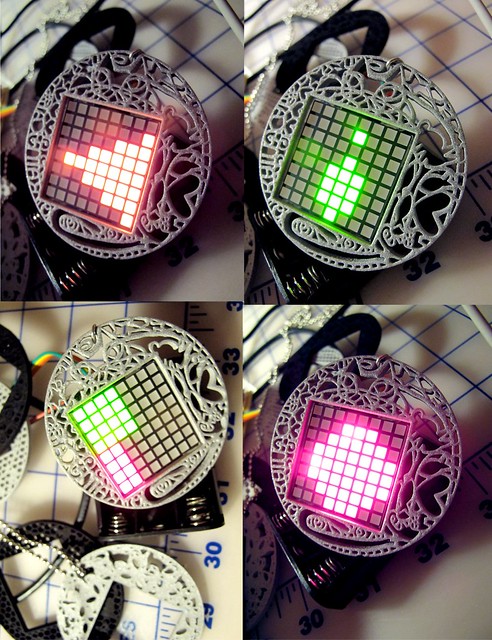
Image shows the pendant in action, plus selection options for pendant modes: live, record or playback.
I created this video to show the EEG Pendant working with the MindWave Mobile headset, I’ve added some crowd atmos to simulate being in a networking situation. You can see on the pendant my attention (red) and meditation (green) levels changing.
My motivation for developing this piece of wearable technology is that in certain spaces and situations we feel more awkward and vulnerable than in others. These situations include conferences and networking events, which put us in social situations where we might be alone or do not know other people very well and also in social areas such as bars and parties. All are situations where people often assume it’s okay to come into someone’s space and talk to them, which depending on how someone is feeling might make them uncomfortable. As well as asking personal questions, some conversations can go on for too long and it’s not usually socially acceptable to interrupt a person speaking mid-flow, then walk away – so how can we best let people know when we feel uncomfortable? As not everyone is adept at recognising or interpreting correctly the emotional signals of the person they are currently interacting with via body language alone, I developed the EEG visualising pendant as a means to go some way to bridge that gap by creating a piece of wearable technology that visualises the wearer’s concentration / meditation levels to signal when the wearer is attentive and interested or drifting away from the conversation. The pendant can also display when the wearer is more relaxed or unfocused (possibly when tired too) – in this state the LEDs display more green LEDs.
I am interested in how we can manipulate social situations and how others see us by controlling our physiological data, either by using the record and playback functions, or by practicing how to control one’s own physiological data, in the case of EEG by, for example, reading, counting backwards, doing times-tables (attention) or defocusing / zoning out (meditation).
The prerecoded data can be played back at a different synchronicity if the wearer wishes to change how they are portraying themselves, for example they are feeling perhaps mischievous or nervous about an encounter and want to appear to be concentrating / paying attention more or relaxed. Manipulation of previously recorded data to influence or change an outcome of a situation is what I call ‘emotive engineering‘. If the wearer does not want to visualise their data in real time they can also use the pendant as an aesthetic piece of jewellery playing back data without the EEG headset.
Broadcasting one’s EEG data is an unusual and distinctive approach to communicating with others in social situations, because it makes data available that is not normally so. Looking to the future, we are are constantly evolving and changing approaches in terms of etiquette in work and social areas. As wearable technology evolves and shapes itself, and is shaped by technological innovation and consumer trends, it will eventually change our social norms and behaviours.

Here I am showing my EEG Visualising Pendant at the International Symposium on Wearable Computers (ISWC) in Zurich, September 2013.
Development of hardware and software of the EEG Pendant
The LED (Light Emitting Diode) matrix form factor I chose for the pendant makes it small and versatile. Its 3 x 3 centimetre size in allows it to be transferable to various outfits and worn in different ways, for example, as a pendant, brooch or badge clipped to a jacket, shirt or tie. The EEG data is visualised in three distinct styles, each being a proportional representation of the signal in real time.
My first action on purchasing an MindWave Mobile back in autumn 2012, was to ascertain how one could use the MindWave Mobile outside its intentional usage, which is to communicate with iOS and Android devices. I’d already found some information on the developer area of the NeuroSky website suggesting there were various other devices and applications that could work with the MindWave Mobile, such as Arduino microcontrollers, but at the time it didn’t have enought information, so I hunted around online for clues and began to piece together an idea of how to go about communicating with the MindWave.
The pendant’s first circuit prototype consisted of an Arduino Uno microcontroller connected via breadboard to a Bluetooth dongle and an LED bar-graph. At this stage the prototype was only visualising one aspect of the EEG data at a time, i.e. attention or meditation data.

I decided that for using the pendant both the attention and meditation data really needed to be shown next to each other, so I swapped the LED bar-graph for a square, single colour LED matrix. This gave a better display of how the EEG levels compared, but I felt these levels needed to be shown to be distinctive from each other, so the green LED matrix was exchanged for a bi-colour LED matrix and C code updated to display the attention data levels as red rectangles and meditation levels as green rectangles. The rectangles were split over two halves of the square matrix and enlarged and contracted in accordance with the data from the MindWave Mobile headset.

Development of the pendant’s data visualisation could have concluded at this point, but it is important to consider the design and aesthetic nature of a piece of wearable technology, from both the wearer’s and of the viewer’s point of view. Also, it is important to consider how to make most of the data in terms of creating an innovative and unique piece of wearable technology. Exploring how the EEG data can be creatively portrayed is a crucial part of the software and hardware evolution of the pendant. So bearing this in mind, I updated the code to add circular and diagonal data visualisations of red / attention and green / meditation. This was originally reflected as lines on the LED matrix, but later as filled shapes with overlaps shown as yellow, which in my opinion, is overall more pleasing to the eye of the viewer.

For transferring the prototype to stripboard, my first attempt used an ATtiny85 microcontroller, which looked like a good fit for the circuit and as the name suggests it’s very small high-performance, low-power Atmel 8-bit microcontroller. Unfortunately, it wasn’t possible to use the ATtiny85 for this project as the LED matrix graphics libraries and the code for the cycle of three data visualising styles meant that it added up to too much code for the 8k Flash memory of the ATtiny85. Instead, I used a low cost Shrimp microcontroller kit that was designed specifically for breadboard / stripboard prototyping and comes as a bag of loose components which makes it fairly flexible in terms of putting together. The Shrimp is based on the Arduino Uno and includes the same Atmel 328-PU microcontroller chip at its heart, so there was not a problem uploading the code and libraries from the breadboard and Arduino Uno circuit. The next step was to test the circuit with appropriate batteries to ensure it could be powered as a stand-alone piece of wearable technology, three AAA batteries sufficed to run the circuit and all its components. I considered using two coin cell batteries in parallel, but decided I preferred a rechargeable AAA option.

The EEG Visualising Pendant on show at the Design Exhibition of the International Symposium on Wearable Computers (ISWC) 2013, Zurich.
Having tested the circuit, the schematic was then drawn out out to ensure the circuit and its components could be neatly fitted onto stripboard. An appropriate size of stripboard was cut, tracks that needed to be cut to prevent short circuits were dug out and the components laid out for the circuit and then soldered. This is quite a time consuming business, but I enjoy building circuits.
The pendant was then ready to be attached to a necklace via small metal hoop links, spaced well enough away from any circuitry not to cause any short circuits. The LED matrix / pendant was attached to the main circuit board via detachable male / female jumper wires so for ease of putting on and also so it could be detached from the necklace and worn as a brooch. During usage, the stripboard circuit can be housed in a small bespoke box to protect it and keep it insulated, so it can then be tucked into a pocket.
Challenges
The key technical challenge laid around communications with the headset, as it is a proprietary device, designed primarily to use with downloaded apps and games. The MindWave Mobile headset communicates with Bluetooth enabled devices that have the MindWave Mobile software installed but does not come with a Bluetooth dongle to communicate with other hardware for development purposes, as does with the NeuroSky research package. So once I was able to get the Bluetooth dongle to pair with the MindWave Mobile, my next task was to have code that then checks for packet strength and quality.
In terms of aesthetic design, the LED matrix was chosen because of its small pendant-like size and shape. It is also very light, so will not weigh heavily on the neck or on the body if worn as a pendant or a brooch. Aesthetics for wearable technology need to be carefully considered if we expect people to wear these devices, so we should ensure that we design them to look elegant and enjoyable to wear. In the past wearable technology has been clunky, heavy and often not very pleasing to the eye or designed with the wearer’s individual needs in mind. Plus we should take into consideration the different groups of people who might wear our devices and the individual preferences of each group. Demographics such as age, gender and lifestyle should be accounted for and user testing on designs carried out.
The NeuroSky MindWave Mobile is a useful low-cost EEG headset, however only having the one electrode on the product can make finding a signal a little cumbersome, though in return we get a comparatively discreet headset compared to others and do not need to use a gel to establish conductivity from the head to the electrode.

Using a Shrimp kit for the microcontroller circuit made for a smaller and less bulky circuit, plus brought the price of the project down. Although this means a little extra time needed to be spent putting the circuits together, soldering and testing to look for short circuits and any mistakes in the layout of components. As mentioned in the project development, the ATtiny85 was an ambitious approach to making the circuit smaller and easier to wear, but was not appropriate due to not enough memory being available for the code and libraries to drive the circuit and LED matrix.
Future Work
The EEG visualising pendant will progress as a project by testing and developing new ways of visualising EEG data that appeal to the user. The presentation of the pendant will be developed in terms of user profiles, for example, how could the matrix be housed and embellished to suit different demographics of users, plus looking at styles for male and female users.
In terms of the hardware, there are possible improvements that can be made to the configuration of the circuit to make the circuit board smaller and more compact. Smaller and lighter batteries would considerably lessen the weight and the bulkiness of the circuit board. As EEG technology progresses it may not be long before the headset form factor may be done away with altogether as smaller and less obvious ways of wearing the EEG electrode and transmitting the data are developed and favoured.
Link to my paper from the 17th International Symposium on Wearable Computers Design Exhibition (ISWC), 2013, Adjunct Proceedings, EEG Visualising Pendant for use in Social Situations
or for a full account download my PhD thesis
EEG Visualising Pendant shown with 3D printed frames
Introduction and motivation
I developed the EEG visualising pendant for use in social situations. The pendant uses EEG (Electroencephalography) signals, which are gleaned from a NeuroSky MindWave Mobile headset. The MindWave is a standalone headset device that detects electrical signals from the brain, which are accessed via a single electrode on a protruding arm from the headband. The electrode makes contact via the wearer’s forehead at the pre-frontal cortex area, where higher thinking states are dominant.
UPDATE: a full account of the EEG Visualising Pendant and how it was used in focus groups and field tests with potential users of emotive wearables can be found in my PhD thesis Responsive and Emotive Wearables: devices, bodies, data and communication (2018) http://research.gold.ac.uk/24005/
The pendant displays data described by the manufacturers as associated with ‘attention’ and ‘meditation’. The attention/concentration data is visualised on the matrix display as constantly updating red LED (light emitting diodes) shapes and patterns and meditation / relaxation data is displayed as green LED shapes and patterns. The pendant incorporates live, record and playback functions, which give the user the choice of displaying real-time EEG visualisations or by recording they can change the synchronisity of the displayed data by playing back up to four minutes of previous brainwave data visualisations as a loop.

Image shows the pendant in action, plus selection options for pendant modes: live, record or playback.
I created this video to show the EEG Pendant working with the MindWave Mobile headset, I’ve added some crowd atmos to simulate being in a networking situation. You can see on the pendant my attention (red) and meditation (green) levels changing.
My motivation for developing this piece of wearable technology is that in certain spaces and situations we feel more awkward and vulnerable than in others. These situations include conferences and networking events, which put us in social situations where we might be alone or do not know other people very well and also in social areas such as bars and parties. All are situations where people often assume it’s okay to come into someone’s space and talk to them, which depending on how someone is feeling might make them uncomfortable. As well as asking personal questions, some conversations can go on for too long and it’s not usually socially acceptable to interrupt a person speaking mid-flow, then walk away – so how can we best let people know when we feel uncomfortable? As not everyone is adept at recognising or interpreting correctly the emotional signals of the person they are currently interacting with via body language alone, I developed the EEG visualising pendant as a means to go some way to bridge that gap by creating a piece of wearable technology that visualises the wearer’s concentration / meditation levels to signal when the wearer is attentive and interested or drifting away from the conversation. The pendant can also display when the wearer is more relaxed or unfocused (possibly when tired too) – in this state the LEDs display more green LEDs.
I am interested in how we can manipulate social situations and how others see us by controlling our physiological data, either by using the record and playback functions, or by practicing how to control one’s own physiological data, in the case of EEG by, for example, reading, counting backwards, doing times-tables (attention) or defocusing / zoning out (meditation).
The prerecoded data can be played back at a different synchronicity if the wearer wishes to change how they are portraying themselves, for example they are feeling perhaps mischievous or nervous about an encounter and want to appear to be concentrating / paying attention more or relaxed. Manipulation of previously recorded data to influence or change an outcome of a situation is what I call ’emotive engineering’. If the wearer does not want to visualise their data in real time they can also use the pendant as an aesthetic piece of jewellery playing back data without the EEG headset.
Monitoring and broadcasting one’s EEG data is an unusual and distinctive approach to communicating with others in social situations, because it makes data available that is not normally available. Looking to the future, humans are constantly evolving and changing approaches in terms of etiquette in work and social areas. As wearable technology evolves and shapes itself, and is shaped by technological innovation and consumer trends, it will eventually change our social norms and behaviours.
Here I am showing my EEG Visualising Pendant at the International Symposium on Wearable Computers (ISWC) in Zurich, September 2013.
Development of hardware and software of the EEG Pendant
The LED (Light Emitting Diode) matrix form factor I chose for the pendant makes it small and versatile. Its 3 x 3 centimetre size in allows it to be transferable to various outfits and worn in different ways, for example, as a pendant, brooch or badge clipped to a jacket, shirt or tie. The EEG data is visualised in three distinct styles, each being a proportional representation of the signal in real time.
My first action on purchasing an MindWave Mobile back in autumn 2012, was to ascertain how one could use the MindWave Mobile outside its intentional usage, which is to communicate with iOS and Android devices. I’d already found some information on the developer area of the NeuroSky website suggesting there were various other devices and applications that could work with the MindWave Mobile, such as Arduino microcontrollers, but at the time it didn’t have enought information, so I hunted around online for clues and began to piece together an idea of how to go about communicating with the MindWave.
The pendant’s first circuit prototype consisted of an Arduino Uno microcontroller connected via breadboard to a Bluetooth dongle and an LED bar-graph. At this stage the prototype was only visualising one aspect of the EEG data at a time, i.e. attention or meditation data.
I decided that for using the pendant both the attention and meditation data really needed to be shown next to each other, so I swapped the LED bar-graph for a square, single colour LED matrix. This gave a better display of how the EEG levels compared, but I felt these levels needed to be shown to be distinctive from each other, so the green LED matrix was exchanged for a bi-colour LED matrix and C code updated to display the attention data levels as red rectangles and meditation levels as green rectangles. The rectangles were split over two halves of the square matrix and enlarged and contracted in accordance with the data from the MindWave Mobile headset.
Development of the pendant’s data visualisation could have concluded at this point, but it is important to consider the design and aesthetic nature of a piece of wearable technology, from both the wearer’s and of the viewer’s point of view. Also, it is important to consider how to make most of the data in terms of creating an innovative and unique piece of wearable technology. Exploring how the EEG data can be creatively portrayed is a crucial part of the software and hardware evolution of the pendant. So bearing this in mind, I updated the code to add circular and diagonal data visualisations of red / attention and green / meditation. This was originally reflected as lines on the LED matrix, but later as filled shapes with overlaps shown as yellow, which in my opinion, is overall more pleasing to the eye of the viewer.
For transferring the prototype to stripboard, my first attempt used an ATtiny85 microcontroller, which looked like a good fit for the circuit and as the name suggests it’s very small high-performance, low-power Atmel 8-bit microcontroller. Unfortunately, it wasn’t possible to use the ATtiny85 for this project as the LED matrix graphics libraries and the code for the cycle of three data visualising styles meant that it added up to too much code for the 8k Flash memory of the ATtiny85. Instead, I used a low cost Shrimp microcontroller kit that was designed specifically for breadboard / stripboard prototyping and comes as a bag of loose components which makes it fairly flexible in terms of putting together. The Shrimp is based on the Arduino Uno and includes the same Atmel 328-PU microcontroller chip at its heart, so there was not a problem uploading the code and libraries from the breadboard and Arduino Uno circuit. The next step was to test the circuit with appropriate batteries to ensure it could be powered as a stand-alone piece of wearable technology, three AAA batteries sufficed to run the circuit and all its components. I considered using two coin cell batteries in parallel, but decided I preferred a rechargeable AAA option.
The EEG Visualising Pendant on show at the Design Exhibition of the International Symposium on Wearable Computers (ISWC) 2013, Zurich.
Having tested the circuit, the schematic was then drawn out out to ensure the circuit and its components could be neatly fitted onto stripboard. An appropriate size of stripboard was cut, tracks that needed to be cut to prevent short circuits were dug out and the components laid out for the circuit and then soldered. This is quite a time consuming business, but I enjoy building circuits.
The pendant was then ready to be attached to a necklace via small metal hoop links, spaced well enough away from any circuitry not to cause any short circuits. The LED matrix / pendant was attached to the main circuit board via detachable male / female jumper wires so for ease of putting on and also so it could be detached from the necklace and worn as a brooch. During usage, the stripboard circuit can be housed in a small bespoke box to protect it and keep it insulated, so it can then be tucked into a pocket.
Challenges
The key technical challenge laid around communications with the headset, as it is a proprietary device, designed primarily to use with downloaded apps and games. The MindWave Mobile headset communicates with Bluetooth enabled devices that have the MindWave Mobile software installed but does not come with a Bluetooth dongle to communicate with other hardware for development purposes, as does with the NeuroSky research package. So once I was able to get the Bluetooth dongle to pair with the MindWave Mobile, my next task was to have code that then checks for packet strength and quality.
In terms of aesthetic design, the LED matrix was chosen because of its small pendant-like size and shape. It is also very light, so will not weigh heavily on the neck or on the body if worn as a pendant or a brooch. Aesthetics for wearable technology need to be carefully considered if we expect people to wear these devices, so we should ensure that we design them to look elegant and enjoyable to wear. In the past wearable technology has been clunky, heavy and often not very pleasing to the eye or designed with the wearer’s individual needs in mind. Plus we should take into consideration the different groups of people who might wear our devices and the individual preferences of each group. Demographics such as age, gender and lifestyle should be accounted for and user testing on designs carried out.
The NeuroSky MindWave Mobile is a useful low-cost EEG headset, however only having the one electrode on the product can make finding a signal a little cumbersome, though in return we get a comparatively discreet headset compared to others and do not need to use a gel to establish conductivity from the head to the electrode.
Using a Shrimp kit for the microcontroller circuit made for a smaller and less bulky circuit, plus brought the price of the project down. Although this means a little extra time needed to be spent putting the circuits together, soldering and testing to look for short circuits and any mistakes in the layout of components. As mentioned in the project development, the ATtiny85 was an ambitious approach to making the circuit smaller and easier to wear, but was not appropriate due to not enough memory being available for the code and libraries to drive the circuit and LED matrix.
Future Work
The EEG visualising pendant will progress as a project by testing and developing new ways of visualising EEG data that appeal to the user. The presentation of the pendant will be developed in terms of user profiles, for example, how could the matrix be housed and embellished to suit different demographics of users, plus looking at styles for male and female users.
In terms of the hardware, there are possible improvements that can be made to the configuration of the circuit to make the circuit board smaller and more compact. Smaller and lighter batteries would considerably lessen the weight and the bulkiness of the circuit board. As EEG technology progresses it may not be long before the headset form factor may be done away with altogether as smaller and less obvious ways of wearing the EEG electrode and transmitting the data are developed and favoured.
Here’s a link to my paper from the 17th International Symposium on Wearable Computers Design Exhibition (ISWC), 2013, Adjunct Proceedings, EEG Visualising Pendant for use in Social Situations or as mentioned above, a for a more in-depth view, see my PhD thesis Responsive and Emotive Wearables: devices, bodies, data and communication (2018) http://research.gold.ac.uk/24005/

Above polymer clay textured frame, below 3D printed frames in sparkly alumide (printed by Shapeways)


