Smart Textiles Salon 2013 was the third bi-annual event organised by Department of Textiles at Ghent University. It was held aptly in the lovely MIAT (Museum of Industrial Archaeology and Textiles), a former cotton mill in Ghent, Belgium. Designers, researchers, artists, engineers, makers and companies, who create and research wearable electronics and e-textiles, traveled from all over the globe to exhibit their work and give approximately (I lost count) thirty presentations during the course of the day.
I took my Baroesque Barometric Skirt along to show and gave a presentation on how and why I made it, the materials I used and the challenges around creating the electronics and code. Below are my slides and an overview:
The Baroesque Skirt creates a unique visualisation for each place I visit, which changes depending on the environmental conditions of the day and my own physiology. It visualises data from four sensors, three of them are environmental: temperature, pressure and altitude, the forth is a temperature sensor that sits on the inside of the skirt and pulls in my body temperature. I’m interested in how I can display my physical data alongside that of the ‘bigger picture’ of elements that I am surrounded by. I made a bespoke skirt for this project due to the way I wanted the RGB LED strip to display from inside. The components are sewn into a removable components substrate apron, which I made because I also want to be able to show the bespoke crafting of the electronics separately, plus I wanted to make it easy to wash the skirt. The apron is held in the middle of the skirt fabric and lining layer by Velcro, with a fitted pocket to hold the 12V battery pack. The skirt has hand painted Okami characters, which incorporate weather designs that entwine with the RGB LEDs underneath. I’ve written the code to drive the components in C, with the inclusion of the Wiring library and the example code library for the BMP085 barometric sensor which does all the complex calculations to convert readings to °C (Celsius), Pa (Pascal) and m (meter) readings. If you want to find out more, see my write up about it.
We set up our exhibits the night before, as the show day was totally jam-packed with presentations and exhibits from the 9am start to finishing around 5pm. I really enjoyed moving around the hall at MIAT the hearing from the creators about each piece of work and how it was constructed. Every project was incredibly interesting and unique, here’s a quick overview of many of the projects to give you an idea of the broad range of work shown.
RUAH by Guilia Tomasello of Nuova Accademia di Belle Arti (NABA), is an interactive, geometric corset. I was impressed by the structure of the corset and intrigued by its workings. It’s driven by LilyPad Arduino, incorporating a stretch sensor and flexinol spring which inflates the central structure of the corset as the wearer breathes. The corset ‘helps people to learn the importance and benefits of deep diagrammatic breath’.
Drapely-O-Lightment: An Interactive OLED Skirt, Solar Fiber: Proof of Concept and Hell–Well–Being: A Waste Conscious E-Scarf, are a collection of wearables that were shown by Aniela Hoitink, Meg Grant, Ralf Jacobs, Loe Feijs and Marina Toeters from the Technical University of Eindhoven. I particularly liked their solar hat, incorporating a flexible photovoltaic solar fibre, which converts sunlight into electrical energy. The team are working on a photovoltaic yarn that can be worked into various fabrics, their approach is: ‘1. First and foremost, we are working on a photovoltaic fibre with a protective coating that will start life as a 5 mm fibre and eventually be extruded to 100µm. 2. Before we get there, we are working on proof of concept prototypes that will help to communicate our idea and show real life applications for the technology. Our current prototypes work via woven glass fibres that guide the light to tiny diodes with PV solar cells. In 5 years we hope to offer the world affordable solar fibres in a range of textile products for daily use’.
Pieterjan Aerts of Howest Kortrijk, Belgium, told us about his work with
organic photovoltaic cells integrated in smart shading. ‘The indoor shading is integrated with organic, flexible and lightweight photovoltaic cells. Energy harvesting as a building integrated photovoltaic and autonomous movement of the shading are the two main features which contribute to the added value of this smart shading.’ He demonstrated how controlling the shading results in getting an optimal angle for energy generation.
Transendense by Galina Mihaleva of Nanyang Technological University, Academy of Art, is ‘an interactive dress that communicates with its wearer by translating the body’s movement into a corresponding light pattern’. It uses a flex sensor that responds to body movement and reflects this in the pattern of an LED array. ‘The light is a metaphor for enlightenment and strives for passion’.
Riccardo Marchesi of INNTEX / plugandwear.com gave a talk on Textile Matrix Sensors. He explained how a low cost pressure sensor can be constructed using alternating conductive / non-conductive layers of fabric, plus a piezoelectric fabric layer, which when pressure is applied can detect and map x and y coordinates via a microcontroller. I can imagine lots of interesting uses for matrix sensors in textiles.
Functional Electronic Screen Printing – Electroluminescent Smart Fabric Watch, by Marc de Vos of the University of Southampton. A prototype digital watch on fabric, created using ‘screen-printed functional electronic pastes to produce the world’s first printed smart fabric watch’. I really liked the flexibility of these prototypes, especially for thinking about future possibilities for PCBs and electroluminescents around the body.
Jin Lam of the Institute of Textiles & Clothing, Hong Kong Polytechnic University, presented Do You Feel Me? A pair of illuminative smart fashion dress prototypes ‘that could react and present various visual communications regarding the changing environmental factors’. The garments incorporate electroluminescent panels that react to each other and illuminate via signals from various sensors, such as proximity, sound, heat humidity and pressure. I really enjoyed seeing all the detail of the intricate design for paneling of these garments in Jin’s slides.
Smart clothing for challenging environments was represented by the work of Aurélie Cayla of the Engineering and Textile Materials Laboratory (GEMTEX), ENSAIT, in her Flexible Thermal Detector in Personal Protective Equipment for Fire Fighters (INTELTEX ‘ intelligent multifilament reactive textiles integrating nano filler based CPC-fiber’). Aurélie showed how heating up a fire fighter’s jacket would result in the detection of a high temperature and alert the wearer. Vera De Glas of Sioen showed us a high visibility softshell jacket that allows the user to regulate a heating system in the jacket for use in very cold conditions. Vera also demonstrated a high visibility jacket that had integrated LEDs for workers in dark conditions or caught in bad weather such as fog. Also on the subject of challenging environments, Tex-Vest – Human Traffic Light was presented by Jaka Plešec of Berlin Weißensee School of Art (KHB). Tex-Vest is intended for police in traffic situations, it translates and visualises hand traffic signals onto a large area of a vest that incorporates SMD LEDs, in red, green and yellow. This vest would be particularly useful in the dark or bad weather conditions.
PeR+ (Perception Rug) by Eva Deckers of the University of Technology, Eindhoven, is an intelligent and interactive carpet, which is sensitive to touch and activity. It is sensitive to pressure and reflects interaction with light and can follow the movements of someone stepping upon it. The sensing and actuating components are integrated by hand into the carpet using twining and tufting techniques.
Ramyah Gowrishankar of Aalto University, School of Arts, Design and Architecture, Finland, presented her intriguing Soft Radio, a palm-sized radio constructed from crocheted fabric. Ramyah is investigating opportunities for creating soft digital interfaces and the Soft Radio has some interesting approaches to the user interface, such as a knitted loop on top that one twists to change between volume and channel seeking modes. The volume and channel can be then changed by wrapping a knitted cord around the spherical radio. Ramyah’s doctoral research ‘aspires to develop an interaction language specific to the new medium of e-textiles, rather than borrowed from regular electronic devices’.
TaSST: Tactile Sleeve for Social Touch by Aduén Darriba Frederiks of the Digital Life Center, Amsterdam University of Applied Sciences. The device is worn on the arm and consists of an input and output layer, the input layer being made from pads of conductive wool, from which changes of resistance are measured and then this controls the intensity of vibration motors in the output layer of a sleeve worn by another person. ‘By varying the location, duration and intensity of touches to the input layer, users can communicate different types of touch at a distance’.
Barbro Scholz of Landeshauptstadt Munchen Kulturreferat exhibited Your Balance interactive textile jewelry, whose inspiration comes from insects. ‘It questions our passive acceptance of applications of control in our daily life and asks what we want textile user interfaces to be’. The system comprises of three textile sensors that monitor the movements of an employee, which are watched and used to control the employees work and life balance’. ‘ Are we like worker-bees, working efficiently towards the centre of the hive?’
Strokes&Dots (3S&D) by Valérie Lamontagne of the Department of Design & Computation Arts, Concordia University, is inspired by early modernist representations of speed, graphic design, abstract art and technology. Her garments incorporate embroidered LEDs and motion or light sensors, the LEDs light up depending on the wearer’s movements or environment.
Bjorn Van Keymeulen of Ghent University showed some fascinating examples in his Lighting Applications with Woven Textiles as Substrates presentation. This included stretchable electronic circuits with a woven conductive yarn network and a fun demo of LEDs and conductive yarn fabric dunked into a tank of water to prove its insulation properties.
Eunjeong Jeon, Martijn ten Bhömer & Kristi Kuusk of the Technical University of Eindhoven, presented their Vibe-ing dress, which contains multiple pockets with connected modular vibration and captive touch sensing PCBs. They’re intended for use in stimulating specific areas of the body for rehabilitation and healing purposes. I was especially interested to hear about the construction of the PCBs that incorporated ATtiny microcontrollers.
Marjan Kooroshina of the Swedish School of Textiles, University of Borås, exhibited her Dreaming Vase. ‘The Dreaming Vase is an object exemplifying my practice-based research project aiming to explore the creative design potential of mixing photoluminescent pigment with conventional textile pigment pastes in textile printing.’ It was interesting to see the difference in how the patterns looked in daylight and nighttime viewing.
Another project that intrigued me was Skweezees: Soft Objects that Sense their Shape Shifting by Luc Geurts of Group T’s Media Lab. A Skweezee is a deformable object, consisting of a soft, non-conductive, stretchy casing and inside amongst its stuffing has conductive steel wool. Resistance between electrodes on the outside calculate the magnitude of deformation of the object and users can record their own Skweezee gestures from this.
The SYSTEX student award was presented to Eef Lubbers of University of Technology, Eindhoven, for her Unlace interactive lace lingerie, which allows couples to connect by becoming more aware of touch and warmth via her lingerie that is painted with thermochromatic ink. The lingerie changes colour over time when touched and is intended to bring couples closer.
For those interested in learning more about smart textiles, Carla Hertleer announced a fantastic new e-learning course from TRITex (Transfer of Research and Innovations in Textile). The course is divided into two modules and covers in module 1. functional and smart textile materials and module 2. covers smart textile systems.
The proceedings were filmed, so sometime soon you’ll be able to watch videos of the presentations. Thanks very much to the organisers Lina Rambausek Lieva Van Langenhove and Carla Hertleer for doing an outstanding job of putting the event together.
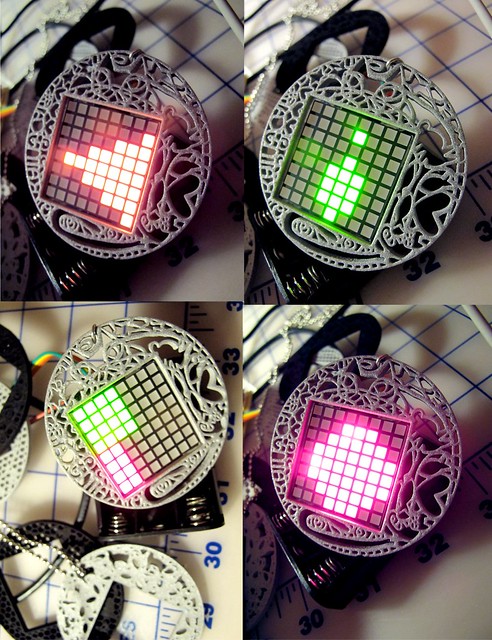
EEG Visualising Pendant shown with 3D printed frames
Introduction and motivation
I developed the EEG visualising pendant for use in social situations. The pendant uses EEG (Electroencephalography) signals, which are gleaned from a NeuroSky MindWave Mobile headset. The MindWave is a standalone headset device that detects electrical signals from the brain, which are accessed via a single electrode on a protruding arm from the headband. The electrode makes contact via the wearer’s forehead at the pre-frontal cortex area, where higher thinking states are dominant.
The pendant displays data described by the manufacturers as associated with ‘attention’ and ‘meditation’. The attention/concentration data is visualised on the matrix display as constantly updating red LED (light emitting diodes) shapes and patterns and meditation / relaxation data is displayed as green LED shapes and patterns. The pendant incorporates live, record and playback functions, which give the user the choice of displaying real-time EEG visualisations or by recording they can change the synchronisity of the displayed data by playing back up to four minutes of previous brainwave data visualisations as a loop.
Image shows the pendant in action, plus selection options for pendant modes: live, record or playback.
I created this video to show the EEG Pendant working with the MindWave Mobile headset, I’ve added some crowd atmos to simulate being in a networking situation. You can see on the pendant my attention (red) and meditation (green) levels changing.
My motivation for developing this piece of wearable technology is that in certain spaces and situations we feel more awkward and vulnerable than in others. These situations include conferences and networking events, which put us in social situations where we might be alone or do not know other people very well and also in social areas such as bars and parties. All are situations where people often assume it’s okay to come into someone’s space and talk to them, which depending on how someone is feeling might make them uncomfortable. As well as asking personal questions, some conversations can go on for too long and it’s not usually socially acceptable to interrupt a person speaking mid-flow, then walk away – so how can we best let people know when we feel uncomfortable? As not everyone is adept at recognising or interpreting correctly the emotional signals of the person they are currently interacting with via body language alone, I developed the EEG visualising pendant as a means to go some way to bridge that gap by creating a piece of wearable technology that visualises the wearer’s concentration / meditation levels to signal when the wearer is attentive and interested or drifting away from the conversation. The pendant can also display when the wearer is more relaxed or unfocused (possibly when tired too) – in this state the LEDs display more green LEDs.
I am interested in how we can manipulate social situations and how others see us by controlling our physiological data, either by using the record and playback functions, or by practicing how to control one’s own physiological data, in the case of EEG by, for example, reading, counting backwards, doing times-tables (attention) or defocusing / zoning out (meditation).
The prerecoded data can be played back at a different synchronicity if the wearer wishes to change how they are portraying themselves, for example they are feeling perhaps mischievous or nervous about an encounter and want to appear to be concentrating / paying attention more or relaxed. Manipulation of previously recorded data to influence or change an outcome of a situation is what I call ‘emotive engineering‘. If the wearer does not want to visualise their data in real time they can also use the pendant as an aesthetic piece of jewellery playing back data without the EEG headset.
Broadcasting one’s EEG data is an unusual and distinctive approach to communicating with others in social situations, because it makes data available that is not normally so. Looking to the future, we are are constantly evolving and changing approaches in terms of etiquette in work and social areas. As wearable technology evolves and shapes itself, and is shaped by technological innovation and consumer trends, it will eventually change our social norms and behaviours.
Here I am showing my EEG Visualising Pendant at the International Symposium on Wearable Computers (ISWC) in Zurich, September 2013.
Development of hardware and software of the EEG Pendant
The LED (Light Emitting Diode) matrix form factor I chose for the pendant makes it small and versatile. Its 3 x 3 centimetre size in allows it to be transferable to various outfits and worn in different ways, for example, as a pendant, brooch or badge clipped to a jacket, shirt or tie. The EEG data is visualised in three distinct styles, each being a proportional representation of the signal in real time.
My first action on purchasing an MindWave Mobile back in autumn 2012, was to ascertain how one could use the MindWave Mobile outside its intentional usage, which is to communicate with iOS and Android devices. I’d already found some information on the developer area of the NeuroSky website suggesting there were various other devices and applications that could work with the MindWave Mobile, such as Arduino microcontrollers, but at the time it didn’t have enought information, so I hunted around online for clues and began to piece together an idea of how to go about communicating with the MindWave.
The pendant’s first circuit prototype consisted of an Arduino Uno microcontroller connected via breadboard to a Bluetooth dongle and an LED bar-graph. At this stage the prototype was only visualising one aspect of the EEG data at a time, i.e. attention or meditation data.
I decided that for using the pendant both the attention and meditation data really needed to be shown next to each other, so I swapped the LED bar-graph for a square, single colour LED matrix. This gave a better display of how the EEG levels compared, but I felt these levels needed to be shown to be distinctive from each other, so the green LED matrix was exchanged for a bi-colour LED matrix and C code updated to display the attention data levels as red rectangles and meditation levels as green rectangles. The rectangles were split over two halves of the square matrix and enlarged and contracted in accordance with the data from the MindWave Mobile headset.
Development of the pendant’s data visualisation could have concluded at this point, but it is important to consider the design and aesthetic nature of a piece of wearable technology, from both the wearer’s and of the viewer’s point of view. Also, it is important to consider how to make most of the data in terms of creating an innovative and unique piece of wearable technology. Exploring how the EEG data can be creatively portrayed is a crucial part of the software and hardware evolution of the pendant. So bearing this in mind, I updated the code to add circular and diagonal data visualisations of red / attention and green / meditation. This was originally reflected as lines on the LED matrix, but later as filled shapes with overlaps shown as yellow, which in my opinion, is overall more pleasing to the eye of the viewer.
For transferring the prototype to stripboard, my first attempt used an ATtiny85 microcontroller, which looked like a good fit for the circuit and as the name suggests it’s very small high-performance, low-power Atmel 8-bit microcontroller. Unfortunately, it wasn’t possible to use the ATtiny85 for this project as the LED matrix graphics libraries and the code for the cycle of three data visualising styles meant that it added up to too much code for the 8k Flash memory of the ATtiny85. Instead, I used a low cost Shrimp microcontroller kit that was designed specifically for breadboard / stripboard prototyping and comes as a bag of loose components which makes it fairly flexible in terms of putting together. The Shrimp is based on the Arduino Uno and includes the same Atmel 328-PU microcontroller chip at its heart, so there was not a problem uploading the code and libraries from the breadboard and Arduino Uno circuit. The next step was to test the circuit with appropriate batteries to ensure it could be powered as a stand-alone piece of wearable technology, three AAA batteries sufficed to run the circuit and all its components. I considered using two coin cell batteries in parallel, but decided I preferred a rechargeable AAA option.
The EEG Visualising Pendant on show at the Design Exhibition of the International Symposium on Wearable Computers (ISWC) 2013, Zurich.
Having tested the circuit, the schematic was then drawn out out to ensure the circuit and its components could be neatly fitted onto stripboard. An appropriate size of stripboard was cut, tracks that needed to be cut to prevent short circuits were dug out and the components laid out for the circuit and then soldered. This is quite a time consuming business, but I enjoy building circuits.
The pendant was then ready to be attached to a necklace via small metal hoop links, spaced well enough away from any circuitry not to cause any short circuits. The LED matrix / pendant was attached to the main circuit board via detachable male / female jumper wires so for ease of putting on and also so it could be detached from the necklace and worn as a brooch. During usage, the stripboard circuit can be housed in a small bespoke box to protect it and keep it insulated, so it can then be tucked into a pocket.
Challenges
The key technical challenge laid around communications with the headset, as it is a proprietary device, designed primarily to use with downloaded apps and games. The MindWave Mobile headset communicates with Bluetooth enabled devices that have the MindWave Mobile software installed but does not come with a Bluetooth dongle to communicate with other hardware for development purposes, as does with the NeuroSky research package. So once I was able to get the Bluetooth dongle to pair with the MindWave Mobile, my next task was to have code that then checks for packet strength and quality.
In terms of aesthetic design, the LED matrix was chosen because of its small pendant-like size and shape. It is also very light, so will not weigh heavily on the neck or on the body if worn as a pendant or a brooch. Aesthetics for wearable technology need to be carefully considered if we expect people to wear these devices, so we should ensure that we design them to look elegant and enjoyable to wear. In the past wearable technology has been clunky, heavy and often not very pleasing to the eye or designed with the wearer’s individual needs in mind. Plus we should take into consideration the different groups of people who might wear our devices and the individual preferences of each group. Demographics such as age, gender and lifestyle should be accounted for and user testing on designs carried out.
The NeuroSky MindWave Mobile is a useful low-cost EEG headset, however only having the one electrode on the product can make finding a signal a little cumbersome, though in return we get a comparatively discreet headset compared to others and do not need to use a gel to establish conductivity from the head to the electrode.
Using a Shrimp kit for the microcontroller circuit made for a smaller and less bulky circuit, plus brought the price of the project down. Although this means a little extra time needed to be spent putting the circuits together, soldering and testing to look for short circuits and any mistakes in the layout of components. As mentioned in the project development, the ATtiny85 was an ambitious approach to making the circuit smaller and easier to wear, but was not appropriate due to not enough memory being available for the code and libraries to drive the circuit and LED matrix.
Future Work
The EEG visualising pendant will progress as a project by testing and developing new ways of visualising EEG data that appeal to the user. The presentation of the pendant will be developed in terms of user profiles, for example, how could the matrix be housed and embellished to suit different demographics of users, plus looking at styles for male and female users.
In terms of the hardware, there are possible improvements that can be made to the configuration of the circuit to make the circuit board smaller and more compact. Smaller and lighter batteries would considerably lessen the weight and the bulkiness of the circuit board. As EEG technology progresses it may not be long before the headset form factor may be done away with altogether as smaller and less obvious ways of wearing the EEG electrode and transmitting the data are developed and favoured.
EEG Visualising Pendant shown with 3D printed frames
Introduction and motivation
I developed the EEG visualising pendant for use in social situations. The pendant uses EEG (Electroencephalography) signals, which are gleaned from a NeuroSky MindWave Mobile headset. The MindWave is a standalone headset device that detects electrical signals from the brain, which are accessed via a single electrode on a protruding arm from the headband. The electrode makes contact via the wearer’s forehead at the pre-frontal cortex area, where higher thinking states are dominant.
The pendant displays data described by the manufacturers as associated with ‘attention’ and ‘meditation’. The attention/concentration data is visualised on the matrix display as constantly updating red LED (light emitting diodes) shapes and patterns and meditation / relaxation data is displayed as green LED shapes and patterns. The pendant incorporates live, record and playback functions, which give the user the choice of displaying real-time EEG visualisations or by recording they can change the synchronisity of the displayed data by playing back up to four minutes of previous brainwave data visualisations as a loop.
Image shows the pendant in action, plus selection options for pendant modes: live, record or playback.
I created this video to show the EEG Pendant working with the MindWave Mobile headset, I’ve added some crowd atmos to simulate being in a networking situation. You can see on the pendant my attention (red) and meditation (green) levels changing.
My motivation for developing this piece of wearable technology is that in certain spaces and situations we feel more awkward and vulnerable than in others. These situations include conferences and networking events, which put us in social situations where we might be alone or do not know other people very well and also in social areas such as bars and parties. All are situations where people often assume it’s okay to come into someone’s space and talk to them, which depending on how someone is feeling might make them uncomfortable. As well as asking personal questions, some conversations can go on for too long and it’s not usually socially acceptable to interrupt a person speaking mid-flow, then walk away – so how can we best let people know when we feel uncomfortable? As not everyone is adept at recognising or interpreting correctly the emotional signals of the person they are currently interacting with via body language alone, I developed the EEG visualising pendant as a means to go some way to bridge that gap by creating a piece of wearable technology that visualises the wearer’s concentration / meditation levels to signal when the wearer is attentive and interested or drifting away from the conversation. The pendant can also display when the wearer is more relaxed or unfocused (possibly when tired too) – in this state the LEDs display more green LEDs.
I am interested in how we can manipulate social situations and how others see us by controlling our physiological data, either by using the record and playback functions, or by practicing how to control one’s own physiological data, in the case of EEG by, for example, reading, counting backwards, doing times-tables (attention) or defocusing / zoning out (meditation).
The prerecoded data can be played back at a different synchronicity if the wearer wishes to change how they are portraying themselves, for example they are feeling perhaps mischievous or nervous about an encounter and want to appear to be concentrating / paying attention more or relaxed. Manipulation of previously recorded data to influence or change an outcome of a situation is what I call ’emotive engineering’. If the wearer does not want to visualise their data in real time they can also use the pendant as an aesthetic piece of jewellery playing back data without the EEG headset.
Monitoring and broadcasting one’s EEG data is an unusual and distinctive approach to communicating with others in social situations, because it makes data available that is not normally available. Looking to the future, humans are constantly evolving and changing approaches in terms of etiquette in work and social areas. As wearable technology evolves and shapes itself, and is shaped by technological innovation and consumer trends, it will eventually change our social norms and behaviours.
Here I am showing my EEG Visualising Pendant at the International Symposium on Wearable Computers (ISWC) in Zurich, September 2013.
Development of hardware and software of the EEG Pendant
The LED (Light Emitting Diode) matrix form factor I chose for the pendant makes it small and versatile. Its 3 x 3 centimetre size in allows it to be transferable to various outfits and worn in different ways, for example, as a pendant, brooch or badge clipped to a jacket, shirt or tie. The EEG data is visualised in three distinct styles, each being a proportional representation of the signal in real time.
My first action on purchasing an MindWave Mobile back in autumn 2012, was to ascertain how one could use the MindWave Mobile outside its intentional usage, which is to communicate with iOS and Android devices. I’d already found some information on the developer area of the NeuroSky website suggesting there were various other devices and applications that could work with the MindWave Mobile, such as Arduino microcontrollers, but at the time it didn’t have enought information, so I hunted around online for clues and began to piece together an idea of how to go about communicating with the MindWave.
The pendant’s first circuit prototype consisted of an Arduino Uno microcontroller connected via breadboard to a Bluetooth dongle and an LED bar-graph. At this stage the prototype was only visualising one aspect of the EEG data at a time, i.e. attention or meditation data.
I decided that for using the pendant both the attention and meditation data really needed to be shown next to each other, so I swapped the LED bar-graph for a square, single colour LED matrix. This gave a better display of how the EEG levels compared, but I felt these levels needed to be shown to be distinctive from each other, so the green LED matrix was exchanged for a bi-colour LED matrix and C code updated to display the attention data levels as red rectangles and meditation levels as green rectangles. The rectangles were split over two halves of the square matrix and enlarged and contracted in accordance with the data from the MindWave Mobile headset.
Development of the pendant’s data visualisation could have concluded at this point, but it is important to consider the design and aesthetic nature of a piece of wearable technology, from both the wearer’s and of the viewer’s point of view. Also, it is important to consider how to make most of the data in terms of creating an innovative and unique piece of wearable technology. Exploring how the EEG data can be creatively portrayed is a crucial part of the software and hardware evolution of the pendant. So bearing this in mind, I updated the code to add circular and diagonal data visualisations of red / attention and green / meditation. This was originally reflected as lines on the LED matrix, but later as filled shapes with overlaps shown as yellow, which in my opinion, is overall more pleasing to the eye of the viewer.
For transferring the prototype to stripboard, my first attempt used an ATtiny85 microcontroller, which looked like a good fit for the circuit and as the name suggests it’s very small high-performance, low-power Atmel 8-bit microcontroller. Unfortunately, it wasn’t possible to use the ATtiny85 for this project as the LED matrix graphics libraries and the code for the cycle of three data visualising styles meant that it added up to too much code for the 8k Flash memory of the ATtiny85. Instead, I used a low cost Shrimp microcontroller kit that was designed specifically for breadboard / stripboard prototyping and comes as a bag of loose components which makes it fairly flexible in terms of putting together. The Shrimp is based on the Arduino Uno and includes the same Atmel 328-PU microcontroller chip at its heart, so there was not a problem uploading the code and libraries from the breadboard and Arduino Uno circuit. The next step was to test the circuit with appropriate batteries to ensure it could be powered as a stand-alone piece of wearable technology, three AAA batteries sufficed to run the circuit and all its components. I considered using two coin cell batteries in parallel, but decided I preferred a rechargeable AAA option.
The EEG Visualising Pendant on show at the Design Exhibition of the International Symposium on Wearable Computers (ISWC) 2013, Zurich.
Having tested the circuit, the schematic was then drawn out out to ensure the circuit and its components could be neatly fitted onto stripboard. An appropriate size of stripboard was cut, tracks that needed to be cut to prevent short circuits were dug out and the components laid out for the circuit and then soldered. This is quite a time consuming business, but I enjoy building circuits.
The pendant was then ready to be attached to a necklace via small metal hoop links, spaced well enough away from any circuitry not to cause any short circuits. The LED matrix / pendant was attached to the main circuit board via detachable male / female jumper wires so for ease of putting on and also so it could be detached from the necklace and worn as a brooch. During usage, the stripboard circuit can be housed in a small bespoke box to protect it and keep it insulated, so it can then be tucked into a pocket.
Challenges
The key technical challenge laid around communications with the headset, as it is a proprietary device, designed primarily to use with downloaded apps and games. The MindWave Mobile headset communicates with Bluetooth enabled devices that have the MindWave Mobile software installed but does not come with a Bluetooth dongle to communicate with other hardware for development purposes, as does with the NeuroSky research package. So once I was able to get the Bluetooth dongle to pair with the MindWave Mobile, my next task was to have code that then checks for packet strength and quality.
In terms of aesthetic design, the LED matrix was chosen because of its small pendant-like size and shape. It is also very light, so will not weigh heavily on the neck or on the body if worn as a pendant or a brooch. Aesthetics for wearable technology need to be carefully considered if we expect people to wear these devices, so we should ensure that we design them to look elegant and enjoyable to wear. In the past wearable technology has been clunky, heavy and often not very pleasing to the eye or designed with the wearer’s individual needs in mind. Plus we should take into consideration the different groups of people who might wear our devices and the individual preferences of each group. Demographics such as age, gender and lifestyle should be accounted for and user testing on designs carried out.
The NeuroSky MindWave Mobile is a useful low-cost EEG headset, however only having the one electrode on the product can make finding a signal a little cumbersome, though in return we get a comparatively discreet headset compared to others and do not need to use a gel to establish conductivity from the head to the electrode.
Using a Shrimp kit for the microcontroller circuit made for a smaller and less bulky circuit, plus brought the price of the project down. Although this means a little extra time needed to be spent putting the circuits together, soldering and testing to look for short circuits and any mistakes in the layout of components. As mentioned in the project development, the ATtiny85 was an ambitious approach to making the circuit smaller and easier to wear, but was not appropriate due to not enough memory being available for the code and libraries to drive the circuit and LED matrix.
Future Work
The EEG visualising pendant will progress as a project by testing and developing new ways of visualising EEG data that appeal to the user. The presentation of the pendant will be developed in terms of user profiles, for example, how could the matrix be housed and embellished to suit different demographics of users, plus looking at styles for male and female users.
In terms of the hardware, there are possible improvements that can be made to the configuration of the circuit to make the circuit board smaller and more compact. Smaller and lighter batteries would considerably lessen the weight and the bulkiness of the circuit board. As EEG technology progresses it may not be long before the headset form factor may be done away with altogether as smaller and less obvious ways of wearing the EEG electrode and transmitting the data are developed and favoured.
I started the day with a presentation on wearable technology, its background, some thoughts on the influence of Science Fiction, Makers and Hackers, and the effect of the miniaturisation of computing and communications technology on wearable technology, plus some examples of existing wearable technology and uses.
The workshop itself introduced the LilyPad Arduino microcontroller and Arduino IDE (Integrated Development Environment), as well as introductory coding and electronics concepts and terms. On the practical side, attendees used crocodile clips to put together a simple LED (Light Emitting Diode) circuit, followed by a more complex LDR (Light Dependent Resistor) circuit and experiment with code to play with threshold levels to turn a bi-colour LED from green to red.
After experimenting with code and watching the results in the serial monitor, attendees sketched out circuits and worked with conductive thread, fabrics and accessories on ideas for wearable electronics and e-textile projects that incorporated the circuits and code sketches explored earlier in the day.
I really enjoyed running the workshop and was very impressed by the enthusiasm and ideas from the attendees, who were roughly of a 50/50 gender mix, a broad range of ages and backgrounds. The wearable projects that evolved during the afternoon included: a colourful flashing Burlesque barrette, a green, sensing Cyclops for a t-shirt whose one eye changed from green to red, a prototype t-shirt for a local drumming band which incorporated sequenced flashing LEDs, a LilyPad turned into a flower featuring a blinking LED to feature on a hat, an LED glove and a t-shirt featuring a figurine with LED eyes and LEDs incorporated into its outfit, plus some experimental circuits with LDR and LEDs.
I had a fabulous & busy International Women’s Day on 8th March. Firstly in the morning I gave a talk on wearable technology at QCon London software conference, held at QEII conference centre. My talk was part of the Making – The Future track and followed a great talk on Physical Pi, which contained lots of great ideas of what you can do with your Raspberry Pi by Romilly Cocking and Steve Freeman of QuickWire
In my talk, Here Comes Wearable Technology, I took a brief look at how wearable technology has emerged from its early roots in cybernetics, sci-fi and clunky but cool electronics (feat the legendary Steve Mann several times) and how artists, designers and makers are developing wearables outside the current bubble of media hyperbole of speculation on Google Glass, Apple’s creations, etc. Plus showed some of my wearable electronics creations and a peek at some of the coding and electronics teaching I’d been doing via e-textiles with various groups of students at Aberystwyth University for Technocamps.
Here’s a lovely video from the event, I apologise in advance for my doolallyness in the bits I feature – I was suffering from the effects of a horrid sinus head cold, which had reduced my brain’s processing to a wibbly mess!
I wanted to bridge the gap between what for me had been an enclosed capsule of capturing / visualizing my own physiological data and entwining it with data from the environment around me. The barometric skirt visualises data from four sensors, three of them are environmental: temperature, pressure and altitude, the forth is a temperature sensor that sits on the inside of the skirt and pulls in my body temperature. I’m interested in how I can display my physical data alongside that of the ‘bigger picture’ of elements that I am surrounded by.
If you haven’t seen or heard of a barometric sensor board before, it’s a PCB (Printed Circuit Board) and the BMP085 I’ve used integrates temperature, atmospheric pressure and altitude sensors, these together constitute a suite of sensors that can be used for looking at weather data. You may have heard of ‘pressure’ attributed to weather terms such as high or low pressure – high pressure generally relates to warm, sunny weather and low pressure colder, wetter weather. Sensors in a barometric board are also used in altimetry to measure one’s present altitude, or for example, how high one has climbed.
I decided that I had to make a bespoke skirt for this project due to the way I wanted the RGB LED strip to display from inside the skirt. It took me a while to find a skirt pattern that I thought would suit the project, I’ve gone for an A-line skirt with a dropped waist, which I thought would support the components quite well, especially as RGB LED strip requires a 12 Volt supply, which isn’t exactly light! My initial idea was to make a jolly big pocket for the battery pack, but after spending a day experimenting with pocket making, I decided to make a Velcro on-and-offable components substrate apron (for want of a better term) which goes in the middle of the skirt fabric and lining layer, I made a fitted pocket on the substrate apron to hold the 12V battery pack.
The skirt required an illustration to enhance the component design and after pondering weather icons and scenes I decided that I wanted a Japanese feel and practiced fabric painting on with calligraphy brushes and tested various fabrics for holding paint, washability, shrinking and ironing capabilities. In the end I chose to create some Okami style weather designs inspired by the beautiful characters and fan art, so after making 2 or three prototype skirts in satin and organza (and being driven half mad by this task) I painted weather bound characters directly onto the skirt.
Having got the skirt (with the lining to shield the wearer from electronics components) mostly made, I moved on to the electronics. This took some of thinking about as I wanted to visualise data outputted from four sensors individually via RGB LED strip, the resulting rats nest took up three breadboards and contained so many components and wires it would have been a nightmare to reproduce and solder onto stripboard. Luckily a way to consolidate this somewhat came with the introduction of two array ICs. I added another temperature sensor to the circuit for measuring my own temperature and the whole lot was driven by a Shrimp kit instead of my usual choice of microcontroller board such as a LilyPad Arduino. “The Shrimp” as explained on the Shrimping It website is “a Arduino-compatible, handmade circuit you can use to create your own digital inventions” – basically it’s a low cost kit of components that you can put together yourself on breadboard or stripboard. This saved me a lot of space as I crammed all my components (bar the barometric sensor I wanted on the outside of the skirt and 12V battery pack) onto one piece of stripboard.
I’ve written the code, or sketch in C, with the inclusion of the Wiring library and the example code library for the BMP085 which does all the complex and clever calculations to convert readings to °C (Celcius), Pa (Pascal) and m (meter) readings. If you’ve got the barometric sensor set up using the Arduino IDE you can open the serial monitor to see the readings fly by.
I spent the next two weeks stripping wire and soldering, I also did a lot of desoldering and resoldering as I endeavoured to get the shrunken, but still a rats nest of wires in the correct groupings of PWM (Pulse Width Modulation) and digital input and output to their respective pins to match up with my code. I can’t underestimate the value of double checking wires and tracks before soldering, though it’s incredibly easy to make mistakes as wiring is always fiddly and tracks are so close together. Also, don’t forget to work out where your track cutting should be before squeezing everything into a small piece of stripboard – always leave an extra line or two in tracks for contingency! If you’re using a coin cell battery, it’s a good idea to get a small, solderable holder for it, but be selective in which type you choose as some are much more fiddly to release the battery than others! I should also mention that I couldn’t find a stripboard friendly version of a 2.1 barrel socket for the 12V battery pack, so I used an SMD one, but had to dig into the stripboard to join two track holes together. Another top tip is try to get a track in between your 12V and ground tracks, just in case of any stray solder bridging!
Before sewing the stripboard and RGB LED strip to the apron substrate, I added some strong Velcro to hold the apron to the skirt lining fabric, next time I do this style of embedded electronics I will use a stronger substrate for the electronics as lining fabric isn’t really robust enough for suspended 12V battery packs! Until I do a better photo shoot / video enjoy some the photos and video I’ve made along the way.
In June 2013, I presented the Baroesque Skirt at Smart Textiles Salon in Ghent, Belgium.
On the 8th July I returned to Aberystwyth with Sophie McDonald to spend 10 days teaching workshops on simple coding and electronics concepts using C programming language and sewable electronics covering for example: parallel / series circuits, switches, how to avoid short circuits, sensors, actuators and an overview of the LilyPad Arduino, for Technocamps.
This was a shorter and more compact experience compared to the 3-day bootcamp we taught during the Easter school holidays with young people from around Aberystwyth. The Easter bootcamp took students on a more in-depth journey through concepts around coding and electronics, where we had time to play with more circuit and code examples using breadboards, and spent an afternoon sewing electronic components into the students’ self-designed circuits – which you can read about here.
The workshops we prepared for this visit were shorter, 3-hour workshops and we presented them to school students, drop-in Technoclub students and home-schoolers of various ages from 8-15 years old. It still included an introduction to wearable technology and covered examples such as Steve Mann’s work in wearable augmented reality that has spanned several decades and I feel charts the miniturisation of technology (in a wearable) over time very well.
The new workshops concentrated more on getting immediate results from coding and electronics, so we pre-sewed the e-textiles side of things before the workshops, which visually took the form of the Welsh Dragon from the flag of Wales, also known as Y Draig Goch (The Red Dragon). The Dragon image was ironed on to tea-towels and then Sophie and I spent over a week sewing the components on so they were all ready to plug into computers upload code and for the students to enjoy experimenting with!
The Red Dragons contained the following components connected via sewn conductive thread: a LilyPad Arduino microcontroller, a LDR (Light Dependent Resistor), parallel LED circuit and fabric switches. Between these components you could do various exercises with various bits of code and combinations of components, so for example with the LDR the students were encouraged to look at the data coming back from the sensor in the serial monitor and change the code accordingly to use the LDR as a light sensitive switch to turn an LED on and off. We also used crocodile clips directly with the LilyPad Arduino, using a resistor and an LED to demonstrate circuits, resistors acting as dam to the flow of electricity, power + to ground -, anode and cathode.
For each class we lead over the 10 days we made small adjustments to the lessons in terms of age and knowledge, plus we played around with the scheduling and timing of the class to try and improve the flow where we felt necessary. We also enquired from accompanying teachers whether the students had already experienced some coding or electronics lessons at school or in the form of after school clubs. Some were familiar with coding and Arduino because they’d sought out to learn these areas themselves or been to a previous Technocamps workshop and it was really inspiring for the other students when these experienced kids chipped in with answers and suggestions in the classes.
Apart from visiting schools and schools coming to Aberystwyth University’sComputer Science Department for workshops from the local area, we also took part in a drop-in Saturday in the Physics Dept, where any youngsters could come along and learn about coding, electronics and robots, plus we ran a workshop for home-schoolers, where the mums stayed and also learned some coding and electronics. I was really impressed by the way the mums threw themselves into getting involved in what the children were being taught. I hope the mums took away that coding and electronics projects aren’t too hard to get up and running, had fun getting involved at the workshop and will carry on learning at home.
We ended the lessons, where there was time, with a short exercise for the students in drawing their own circuits based on ideas they had for pieces of wearable technology, the ideas that were generated were very inspired and the students enjoyed a show and tell of ideas at the end of the workshop.
Our time at Aberystwyth also coincided with iOSDev conference at the university and about 20 conference delegates came to an impromptu demonstration we gave of the Dragons and asked us interesting questions. We also had some cool guest speakers for some of our workshops, we had a talk on the World Wide Web by Roger Boyle, My Life as a Software Engineer by Jonathan Roscoe, a talk about the European Parliament, from MEP for Wales, Derek Vaughan and last but certainly not least a visit from the Welsh Dalek and K9 courtesy of Steve Fearn of the Institute of Maths and Physics at Aberystwyth University.
In conclusion, we found the workshops very rewarding and the students genuinely seemed to get a lot out of them. With the circuits already sewn together by Sophie and I, a lot of time was saved and we packed in the maximum amount of examples and experiments within the three-hour workshops. I feel that all the sewing, slides and preparation that we did upfront and continually reviewed for each new session paid off really well for different age groups, class sizes and types of student. We found we zipped through some parts of the workshops where a few of the students had prior knowledge of coding, electronics or microcontrollers. Plus the students with a little knowledge were able impress their friends and were also eager to help out anyone who needed a bit of extra help or instructions repeating. Classes where students had no prior experience went really well too and to time, as students became confident really quickly with code and electronics when they realised they could get instant results from the electronic components by making adjustments to the code and uploading it to the LilyPad Arduino.
Letting the students experiment and make mistakes in the code to see what works and what doesn’t in terms of learning functions and formatting really helped them get a feel for putting code and electronics together. The circuit drawing session at the end of the workshop got the students thinking about how they could apply what they had learned to personal garments and also how they could be ambitious and stretch their knowledge and experiments.
How time flies! I wrote up my highlights for WT – Wearable Technologies Conference back in February and forgot to post them. This is a cut-down version of my original notes as I had a gazillion pages – I think less is more in this case, so here is a little insight as to what I saw and heard about…
Smart phone apps and integration were a dominant feature of many presentations and products shown at January’s WT Conference held at Messe München, Germany. I also noted we saw quite a few examples of wearable technology by several companies and speakers presented in bracelet / band form factor, which made me wonder – is this going to be the most popular way of packaging wearable technology for the consumer market for the next couple of years?
A jam-packed day of presentations made it difficult to select my highlights, but my personal shortlist included Dr Paul Lukowicz’s keynote on ‘From Cyborgs to Smart Phones’ where he posed the question ‘So has the smart phone killed the wearable?’ he answered his own question by stating ‘no’ and that the smart phone has made the public ‘ripe for wearable systems’, such as sport and health apps for starters. He described how he thought wearable technology should be ‘ambient’ and be performing tasks in the background whilst the user gets on with their life. He concluded that it’s an exciting time for wearable technology because ‘the public accepts the need for it and so it has the potential to be huge’.
I definitely concur, with Paul that smart phones have made an excellent ‘in’ for the mainstream public to get into and used to integrating wearable technology into their lives. Also that ambient systems, for example monitoring one’s blood pressure or diary continually in the background and only alerting the wearer/user when they need to be informed is one of the biggest advantages of us being able to wear powerful, small computers.
David Icke talked about stretchable, conformal electronics on the human body and the challenges of rigid and brittle electronics that historically don’t bend and stretch, thus making it difficult to produce comfortable wearable technology that stretches and moves with the wearer’s body. He showed an example of stretchable epidermal electronics that could be used for sensing vitals signs, track the user’s voice, as well as having potential for gaming use. He summarised that electronics worn on and inside the body will revolutionise fitness and healthcare.
Less rigid and sharp electronics are definitely essential for making wearable electronics viable – plus they also need to be light and washable and the power management (batteries) aspect needs to be solved as soon as possible – it would be great if we were a bit further ahead with power harvesting technologies for the wearer.
Michaela Klinger discussed how to make the best of smart phone technologies in Telehealth, plus how necessary standards are for medical wearable technology, giving examples such as how the Continua Health Alliance aims to do this. She also made the point that technology for health needs to be secure and if you’re a company thinking of starting out in Telehealth you should be prepared for the most stringent testing via the Medical Device Directive.
For me the most interesting part of Micheala’s talk was around standards and directives, as you can imagine with all this blossoming technology for health, areas such as privacy and storage of data are of paramount importance – as well as secure systems so the technology itself can’t be hacked. Plus it’s obvious that we need stringent standards & guidelines for technology that regulates something as crucial to the wearer as an insulin pump or a pacemaker. There were three presentations in the afternoon about various approaches to tackling diabetes via wearable technology and it was very interesting so observe how their technology varied and what safeguards were built into them, plus the sustainability of the products and how comfortable they looked. It also seemed very prudent that with various systems being developed, some kind of interoperability was needed.
I enjoyed my trip to München, for WT Conference, there seemed to be a lot of convergence of ideas and great company from colleagues and friends I’d met at previous companies. Overall I came away still extremely excited about developments in wearable technology and 2012 is definitely the year that wearable technology will go mainstream. I’d definitely go again.
Since last December, Sophie McDonald (usually of Mz-TEK) and I have been plotting a 3-day wearable technology bootcamp with Emma Posey and Hannah Dee (who’s also blogged here) of Technocamps for 11-19 year-old students in Aberystwyth.
Technocamps is a £6 million project led by Swansea University in partnership with the Universities of Bangor, Aberystwyth and Glamorgan to inspire young people aged 11-19 to attend workshops on computing-based subject such as wearable technology, robotics, game development, animation, digital forensics and more. Their long-term goal is to encourage young people to pursue careers in an area that will drive economic growth in Wales, which I’m all up for helping with.
Sophie and I put together a 3-day wearable technology schedule introducing electronics via the LilyPad Arduino sewable microcontroller environment, plus coding via C programming language sketches, which drive the inputs and outputs of the LilyPad Arduino.
The three-day bootcamp attended by approximately twenty-one 11-14 year-olds, with Sophie, Hannah & myself leading and helping the students through the workshops. I did a kick-off presentation to introduce some existing projects and aspects regarding the broad range and applications of wearable technology – plus the notion of only being limited by one’s imagination! Also some info on the ease of availability of suitable components and the supportive nature of the Maker community, tutorial sites and forums for young creators interested in finding out more after the workshops.
Day One: of the workshops began with a look at the LilyPad Arduino microcontroller, followed by the Arduino programming IDE (Integrated Development Environment). We moved on to getting an LED (Light Emitting Diode) to light up and blink from the LilyPad with a bit of coding. In the afternoon we played around with series and parallel LEDs on a breadboard with some more playing with code. We were delighted to see some of the students having fun with up to 14 blinking LEDs on their circuits!
Day Two: looked at creating an LDR (Light Dependent Resistor) circuit that would light an LED, a little more challenging, but by the end of the day, all the students had a working circuit that they then tweaked to become a light switch – by noting the serial data and reflecting it in their code.
Day Three: we leapt straight into designing our circuits for sewing onto fabric with the LilyPad Arduino, the students worked out their own designs for circuits and components, plus coded them accordingly. We had some fabulous compositions and designs. When parents and guardians came to inspect the fruits of the three-day bootcamp at the end of the day, they all seemed very pleased with the results, plus we gave out some certificates.
I feel that the wearable technology workshops using the LilyPad Arduino are a fantastic introduction into electronics and coding for young people. All the students were amazingly enthusiastic and persevered to grasp concepts new to them, plus they were able to have fun and incorporate their own design input into circuits, plus modifying and playing with code.
The students were all very keen and were so engrossed in their work they genuinely didn’t want the workshops to finish. They took their work home with them, plus a sheet of helpful links to help them carry on their own. Hannah also set up a group for Arduino in Aberystwyth (I’ll find the link and add later).
Eighty percent of the students were girls and I’m pleased to say that any preconceived ideas that have been banded about in the past of electronics / coding being more suitable pursuits for boys did not ring true at all – all the girls took to both disciplines of electronics and coding like ducks to proverbial water and there was no difference in the support needed for boys vs. girls for these workshops. Also on the other foot, the boys took to sewing and textiles without batting an eyelid – also dismissing more stereotypes around gender.
To summarise, I feel that wearable technology via LilyPad Arduino is a great way for students and people, whatever age and background, to enjoy an introduction to electronics and coding. I feel what may have been missing or miss-interpreted in the past is the real need to have a reason or fun pursuit for participating and personalising in the pursuit of electronics and coding – once people have a project or reason to make something they’ll enjoy using, they’re off!
For me it was very rewarding three days of workshops all round, we have a few tweaks to make to the workshops and slides which we’re going to do as soon as we have our breath back.
On 28th February I gave a talk (slides below) at the Nano4Design workshop at Nanoforce, QMUL, a day of presentations and networking around the convergence of design (mainly textiles at this event) and nanotechnologies, which was chaired by Dr Martin Kemp of NanoKTN. Nano4Design is a focus group to bring together the design and nanotechnologies communities together.
I really enjoyed the presentations, which have definitely expanded my knowledge on nanotechnologies in the field of textiles. I made tons of notes and below are my summaries of the talks.
Prof Ton Peijs, Centre for Materials Research, QMUL, kicked off the presentations with a keynote on intelligent nanocomposite fibre for sensing. He talked about intelligent fibres for smart textiles, that included sensors, actuators and touched on conductive materials to make strain sensors. Part of his talk focused on the process of manufacturing yarns and using nanotubes in polymers, to make a high strength nano-reinforced fibre.
Bill Macbeth, Textile Centre of Excellence, talked about Yorkshire’s Textile Innovation Programme, whose aims include developing and delivering training to meet the changing needs of industry, as well as feasibility studies, industrial research, experimental development. He mentioned projects such as combating counterfeiting in textiles and looking at provenance for textiles made in Yorkshire using DNA profile of dyes as proof that cannot be washed out, is cost effective and are acceptable as evidence. Bill also talked about nano-enhanced textiles and fascinating 3D weaving machines that were capable of making very strong woven structures for automotive and aerospace.
Professor Janis Jefferies of Goldsmiths College, U. of London, gave a talk on the Wearable Absence project. It is a system of wearable devices that incorporate wireless technologies and bio-sensing devices such as temperature, heart rate, respiration and GSR (galvanic skin response) sensors. The sensors collect data to analyse the wearer’s emotional state and in turn to activate a database of images and sounds, creating a narrative or series of messages to evoke memories of an absent person. This is done via speakers in the garment’s hood or shoulder seams, scrolling text on an LED array, or video and photos.
My talk, ‘Sensors for e-textiles creatives’ discussed how cheaply available electronic components, microcontrollers, plus the evolution of hacker / maker culture and its expanding communities are causing a boom in interest in coding and electronics from new sections of society, from kids to crafts people to new ways of approaching tech start-ups for creatives. Plus how these new approaches are changing the way designers and artists are able to create work. New considerations to how electronics are designed, such as the sewable microcontroller, the LilyPad Arduino, means electronics no longer have to be seen as cold, sharp, grey and dull and hidden inside work! I showed some examples of my wearable electronics work, which incorporates electronic components and e-textiles into the design of garments and artworks.
Richard Holman, materials technologist, talked about the D30 company portfolio in terms of shock absorption and impact technologies for footwear to motorcycle applications, personal protective equipment such as a riot suit used by the French Gendarmerie and snow board protection. D30 is a composite material comprising of several polymers. He said that ‘the key concept is sensitivity of dilated material that retains flexibility ‘.
Ellie Runcie of the Design Council, talked about the positives of connecting designers with companies to help define and resolve problems. How good design is concerned with what people need, what is technically possible and what is financially possible. She gave an example of a company working in nanotechnology that was struggling to define their business, but with expertise they were helped to develop their brand and applications for various audiences, which turned the company’s fortunes around and they went on to secure funding and become successful.
Professor Raymond Oliver, Northumbria University, School of Design, talked about several areas around smart materials and technology, using examples such as the changing economic landscape over time and impact. For example, how the digital / physical fusion of embedding intelligent technologies into social environments can be mapped against assets, phases and aspects of a one’s life, which makes for human centered technology. He warned us though that ‘progress is slower than prediction’.
Olivier Picot, PhD researcher at QMUL told us about the production of reflective fibres for smart textile applications, using novel techniques to obtain visual effects based on diffraction and/or reflection of light. This is done via a bi-component fibre system where the fibre (natural or synthetic) is coated with a functional layer of liquid crystal, which gives it new properties, such as changing colour and appearance as a consequence of strain and environmental input.
Dr Andrew Dean of Spartan Nano, told us about his work with Durham University on nanostructure surfaces and reducing bacterial contamination and fouling on surfaces. We heard how they’ve been using nanostructured antimicrobial films for targeting pathogenic bacteria such as e-coli and staphylococcus aureus in order to kill the bacteria. In the future they’re hoping to develop this technology for use on bandages.
Dr Daniel Lynch, from Exilica told us about his work in embedded fragrances in textiles using micrometer-sized polymers in nano-porous networks. A lot of plastics have odour issues, especially recycled plastics, so it’s really useful to have the ability to improve their smell! We heard about how research is looking into improving the washability aspect of these plastics so they will continue to smell nice after several washes.
Overall it was a really good day, plus I met and had chats with some really interesting people and not forgetting that it was good to hear about the work at Nanoforce, QMUL, so I’d definitely go to another Nano4Design event .
Meep, belatedly catching up with blogging about Music Hackday London, which happened back in December 2011 and was held in the wonderfully retro boardrooms of the Barbican, London.
My hack for Music Hackday was an interactive musical t-shirt and as you can see I’ve ‘hacked’ the official Music Hackday t-shirt 😉 I didn’t win any prizes, possibly because just about every sponsor awarded prizes only to people who made apps with their APIs – so a bit disappointing and a bit of an issue for Hackdays.
Basically I wrote a script that allows a LilyPad Arduino to use its pads as a musical keyboard. I’ve elongated these pads to make a musical scale and the user can play tunes in the C scale – C,D,E,F,G,A,B,C
The piece uses LilyPad Arduino with sewable conductive thread, rather than wires to conduct voltage and signal.
To play it the user takes a stylus and plays the notes on the LilyPad pads or can play by touching the conductive thread tracks or pad on the corresponding LEDs which also light up individually when a note is played.
It was also an exercise in acknowledging one’s blushing embarrassment in that it’s quite odd and one feels self conscious to be wearing a musical t-shirt played by someone else – maybe better to stick to playing such things yourself 😉
If you’d like to see some of the hacks, have a peruse of the Music Hackday wiki.


